Monday 27 December 2010

Christmas: a time for surprises

Christmas has come and gone and I was treated to a second-hand DELL Inspiron 1501 laptop for the knockdown price of a new Macbook!

My daughter has abandoned Windows for the forbidden fruit and I got her cast-off. Her five-year-old laptop really was on its last legs and, despite a new battery a month or so ago, it seemed certain that the old workhorse was destined for the scrap heap (I mean, recycling centre, of course).

However, once the new Mac was up and running with all the data and files (including the awful iTunes software) transferred from the DELL, I decided to see how Ubuntu would perform on this ageing hardware before consigning it to the junk yard. I opted to run Karmic 9.10 (knowing that the graphics would never cope with a newer version) and eschewed to cut-down netbook version for the desktop software already running on my DELL Dimension. Of course, this meant that I didn't need to worry about downloading and validating a new OS and I used the same disk as my desktop install.

I kept things simple with a clean installation that replaced Windows Vista (Basic) with Ubuntu Karmic. I didn't even bother partitioning the drive: this experiment really was just to satisfy my curiosity and, if things worked out ok, to give me a disposable device that I could test stuff on.

The only hiccup that I encountered with the install was that the wireless network card refused to work. Running

lspci -nn | grep WLAN

in a terminal, gave me the following information about my WLAN card:

05:00.0 Network controller [0280]: Broadcom Corporation BCM4311 802.11b/g WLAN [14e4:4311] (rev 01)


This information told me that I needed the b43 drivers and firmware for my card. This is achieved by installing the fwcutter package (using an ethernet connection!) and extracting the firmware for the card.

sudo apt-get install b43-fwcutter

You can follow the instructions via the Ubuntu Wiki (here) if you need precise instructions on getting a Broadcom NIC working. A reboot was necessary once the correct driver was installed.

Once the wireless card was up and running, the little DELL exceeded all expectations! It's lightning quick to boot (and to shut down) and it seems to enjoy running Ubuntu far more than it ever did Windows: all-in-all, a lovely surprise for Christmas and a great "toy" to play with (and blog about) over the coming weeks and months.

Happy New Year.

Monday 29 November 2010

Demise of the DELL

Recently, I wrote about synchronizing Windows mobile PIM data with Thunderbird on my Ubuntu distro. I have a couple of PDAs running Windows mobile: a DELL Axim X50 (running WinMob 2003) and an HP iPAQ hx2790 (running WinMob 5.0). Since publishing my tutorial, I have been happily synchronizing both devices successfully over my home network.

However, my recent attempts to improve my understanding of small networks have persuaded me to improve my wireless access security from WEP to WPA and this simple change of security encryption played havoc with my PDAs: after changing to the more secure WPA protocol, neither could connect to the network. A little research suggested that this is a well-known problem and HP has already issued a fix for my iPAQ: however, installing it still didn't allow my device to connect but, following some chatter on various forums, I suspected that using Odyssey Client (pdf) might provide the solution. Fortunately, although Odyssey isn't installed by default on the iPAQ, HP ships a licenced copy on the companion CD (at least, it did with my hx2790!) and installing it is simple using Activesync or Mobile Device Center (and a Windows machine, obviously!). Once installed, configuring the client was straightforward and my iPAQ rejoined my network as a wireless node.

Sadly, the news for my X50 is not so good. DELL did ship the X50 with a pre-installed version of Odyssey, but even with this utility running, my PDA can't connect to my wireless access point even though it has no trouble detecting the network. Even a hard reset hasn't had the desired effect and I suspect that the DELL will shortly be consigned to the drawer where legacy devices go to die.

Friday 26 November 2010

Networking For the Rest of Us


Network Know-How: An Essential Guide for the Accidental Admin
John Ross
No Starch Press
ISBN: 978-1-59327-191-6

It is unlikely that those with extensive theoretical and practical experience of designing, building and maintaining small computer networks will find much of interest in John Ross' book. However, if like me you are the archetypal "accidental admin", this may just be the most useful computer book that you ever buy!

In Network Know-how, Ross introduces the novice network manager to the basic concepts of networking and provides important insights into why things work (or sometimes don’t work) in small network environments. He offers practical advice on LAN design as well as equipment and infrastructure installation, giving concise instructions on how to setup and operate a range of servers, clients, and peripherals. All this Ross achieves without resorting to unnecessary jargon or gross over-simplification: in short, it is networking for the rest of us!

Given the extensive range of hardware and software available, the book does tend to be understandably vague regarding hardware and, in places, a little Windows-centric. Nevertheless, Ross has been careful to provide pointers for Mac and Linux users even if it is not as comprehensive as one would have liked and, because he explains the principles of networking so well, these signposts are more than sufficient to cope with all but the most specialised kit. Reading this book has resulted in significantly improved security in my own network and the ability to share files and services across multiple operating platforms (Windows, Windows Mobile, & Linux) and devices.

Overall, this book is a thoroughly recommended tract on networking for non-specialists. As with all books of the genre, this one is over-priced. However, don't let this fool you into believing that it is not value for money: if you want a secure and reliable network over which you can share data and resources, this is an excellent introduction.

Thursday 25 November 2010

If at First You Don't Succeed...

My ongoing battle with my NAS and netbios names prompted me to wonder whether I could share files between my Ubuntu machine and Windows Vista. In theory, a public share on the network from Linux should be a simple matter but, even sharing a directory as root via Samba, met with no success.

However, one thing that I have learned from my fight with my network is that trial and error only gets you so far: at some point you have to understand how things work in order to get things done. Clearly, my accumulated networking knowledge needed to be put on a more secure noetic footing if I was ever going to get my disparate operating systems and network nodes talking to one another.

In an effort to combine my practical experience with some meaningful intellectual understanding, I turned to John Ross' excellent book, Network Know-how: an essential guide for the accidental admin. It was here that I discovered how subnets are identified which, in turn, triggered my understanding of why Samba wasn't doing what I expected.

The /etc/samba/smb.conf file, specifies which hosts (servers) can connect to your machine in order to share directories and files. These are called the allowed hosts and you have to tell Samba what they are by changing the configuration file.

Open the Smb.conf file:

sudo gedit /etc/samba/smb.conf

Enter your password when prompted and the smb.conf file will open in a plain text editor. Look for the line that identifies the allowed hosts (mine is line 7) and add your LAN subnet address. For instance, if your LAN IP address is 192.168.1.1, then your LAN subnet is 192.168.1 and that's all you need to add.

Save and close the file.

Restart Samba:

sudo /etc/init.d/samba restart


Hey Presto! Suddenly all of my shares appeared in Nautilus and I could see my shared directories in File Explorer from my Windows Vista box!

But that's not the best news...

After amending my Samba configuration, I can now use netbios names rather than IP addresses meaning, in theory at least, that I can return to dynamic IP addresses and no longer worry about moving my network around!

How cool is that?

Thursday 11 November 2010

Follow the KISS Principle

Sometimes I'm so busy trying to be clever I don't bother to try the simple solutions!

You may recall that earlier this week I suggested that bookmarking my NAS device in Nautilus rather than mounting it as a permanent share meant that, among other things, I couldn't view thumbnails in the file browser. This is of course just wrong!As always, Linux makes viewing thumbnails on remote drives simple but doesn't make it the default behaviour.

To change your settings:
  1. Open Nautilus from the Places menu on your Panel
  2. Click on Edit and then select Preferences
  3. Select the Preview tab and, under the Show Thumbnails: option (in the Other Previewable Files section), select "Always"
As is often the case, the simple solution is often the best choice!

Tuesday 9 November 2010

The Battle Continues!

After thinking that I had finally resolved my problems with mounting a Windows NAS to my Ubuntu box, I've noticed that my system takes upwards of two minutes to shutdown. It wasn't a huge problem as, whatever was hanging at shutdown eventually timed-out and the box closed down successfully.

However, things like this irritate me and I just had to find out what was causing the problem. Running the usual logs (/var/log/dmesg & /var/log/messages) suggested that the problem was some sort of segfault with Python: that didn't make much sense to me as I hadn't done anything to cause Python to hang.

So, working on the assumption that the last thing I did caused the problem, my attention returned to my ongoing battle with my network attached storage device. A simple test to see if this was the problem revealed that, for some as yet undetermined reason, the NAS wasn't being unmounted properly at shutdown causing some kind of network interface error.

I used the CLI to unmount the NAS

sudo umount /media/device_name

Where device_name is the name of the NAS (in my case, mybook). Thereafter, shutting Ubuntu down took seconds rather than minutes indicating that I had found the problem.

After struggling for a week to get Ubuntu to mount the network share, I didn't really want to undo everything, but I did want to stop the automatic mount at bootup. This is easy: just comment out the device line in the fstab file.

sudo gedit /etc/fstab

Add a # (hash) to the relevant device and grub will ignore the line at boot. My file looks like this:

# /etc/fstab: static file system information.
#
# Use 'blkid -o value -s UUID' to print the universally unique identifier
# for a device; this may be used with UUID= as a more robust way to name
# devices that works even if disks are added and removed. See fstab(5).
#
#
proc /proc proc defaults 0 0
# / was on /dev/sda1 during installation
UUID=d5837259-b437-46a8-a10c-3d962bf58e41 / ext4 errors=remount-ro 0 1
# swap was on /dev/sda5 during installation
UUID=1b210c31-3575-4179-8fbd-c72984f8c8bb none swap sw 0 0
/dev/scd0 /media/cdrom0 udf,iso9660 user,noauto,exec,utf8 0 0
/dev/fd0 /media/floppy0 auto rw,user,noauto,exec,utf8 0 0
#//MYBOOKWORLD/id19748494 /media/mybook cifs credentials=/home/jogga/.smbcredentials 0 0


I can still reach the device using Nautilus and the ip address but I can't use the device name (Netbios name) or the ip address to mount the device.

Monday 8 November 2010

Revisiting Rhythm

Following my post about repairing my Rhythmbox library, a friend of mine over at Delliberate suggested that a better way of achieving my goal was to mount my network drive as a permanent Windows share on my Ubuntu box.

I've struggled with this for over a week, trying to get Ubuntu and Samba to play nice with Netbios names (clearly, using the IP address to establish the mount defeats the object!) but eventually had to acknowledge that the problem was better than I! Nautilus connects to my network drive using the ip address without any difficulty, all that is required is to type the ip address of the drive followed by the share name into the location dialog box in Nautilus using:

smb://###.###.###.###/share_name

Where ###.###.###.### is the ip address for the drive and share_name is the name of the directory (or folder) that you want to reach. Instructions for creating a permanent mount point can be found at the Ubuntu Wiki (here) and, if you can't get Ubuntu to resolve Netbios names, you can substitute the ip address for the server name.

However, today I found a workaround that, whilst it doesn't completely solve the problem of Netbios resolution, does provide a partial solution. You can add the Netbios name to the /etc/hosts file and Nautilus will use this to resolve the ip address to the device name. Open the /etc/hosts/ file:

sudo gedit /etc/hosts

and input your password when prompted. Add the ip address and the Netbios name as follows:

###.###.###.### Netbios_Name

My file output looks like this:

127.0.0.1 localhost
127.0.1.1 jogga-desktop
192.168.1.10 MYBOOKWORLD
# The following lines are desirable for IPv6 capable hosts
::1 localhost ip6-localhost ip6-loopback
fe00::0 ip6-localnet
ff00::0 ip6-mcastprefix
ff02::1 ip6-allnodes
ff02::2 ip6-allrouters
ff02::3 ip6-allhosts


Line 3 is the one of interest! If I've understood how this works properly, Nautilus uses the etc/samba/smb.conf file to resolve Netbios names (in a specific order): the smb.conf file specifically lists the host as a reference source. Now I can use the Netbios name rather than the ip address which is more intuitive when searching and browsing in Nautilus. In my case, I type:

smb://MYBOOKWORLD/Share_Name

I also had to change the /etc/fstab file in order to make the permanent mount resolve the MYBOOKWORLD name as per the instructions at the Ubuntu Wiki (linked above).

Of course, if the ip address changes, the workaround stops working! However, it's a simple matter to amend the /etc/hosts file to reflect the new ip address and all bookmarks that use the Netbios name should be restored to rude health!

There are some tangible benefits of mounting a network share at boot, not least, pictures and video render in Nautilus (as opposed to icons), making file identification much easier, so it's been worth the pain.

Sunday 7 November 2010

Wallpaper Fetish

By now you may have realized that I like playing around with the decorations on my Ubuntu box! However, if you take lots of photographs and want a quick and convenient way of setting one as your wallpaper, download and install nautilus-wallpaper from the repository (or use Synaptic)

sudo apt-get install nautilus-wallpaper

Enter your password at the prompt.

After rebooting your PC, you can right-click any picture in your directory and select the (new) Set as Wallpaper... option.

Monday 1 November 2010

Redecorating

Changing wallpaper and themes is a great way of revitalizing the Ubuntu experience, but have you ever noticed how a fabulous looking picture can drown out text and icons on your panels and desktop? Sometimes, the effect is so bad as to render even the best pictures unusable as a wallpaper!

However, there is a simple way to adjust some of the colours and settings of these essential elements without having to write clever scripts (or copy them from the Internet ;)): install Gnome Colour Chooser from the Ubuntu Software Centre.
  1. From the Applications menu, select the Ubuntu Software Centre
  2. Type Gnome Colour Chooser into the search box
  3. Install the application
It's that easy!

Once installed, you'll find the application shortcut in the System → Preferences Menu and just click the icon to open the program.


One of the real benefits is being able to change the properties of the font (colour, size, and style), allowing you to use dark backgrounds without loosing sight of your menus, but there is a host of options to play with and you can have hours of fun designing (should that be, redesigning?) your theme.

Enjoy!

Sunday 31 October 2010

Repairing Rythmbox

One of the problems that I experienced when I moved house recently was that my network drive's IP address changed when I plugged my Ubuntu box into the new router equipment. For most day-to-day access this was no problem, I simply repaired the shortcuts in the Nautilus file explorer and everything worked as it should.

However, Rythmbox, my default music player, could no longer read my music library (stored on my network drive) and it took me a little while to figure out how to point the player to the right place. Actually, it's rather a simple operation in Ubuntu, as most things tend to be!
  1. Navigate to /home/[username]/.local/share/rhythmbox
  2. Using your preferred text editor (mine is SciTE), open the */rhythmdb.xml file
  3. Use the text editor's Find/Replace All function to change the IP address or new location
  4. Save the file and reboot your PC
Reopening Rythmbox should rebuild your database and correct any errors when it reconnects with the library. However, as a precaution, I recommend making a copy of your */rhythmdb.xml file before making the adjustments described, just in case you corrupt the original file.

Saturday 30 October 2010

More Karmic Candy

NASA Image of the Day and the National Geographic Picture of the Day are two of my favourite websites. As you can imagine, these two organizations produce some stunning photographs and many of them end up as temporary wallpapers on my Ubuntu desktop.

As with everything else in Linux, changing backgrounds is easy and, if you know where to look, customizing the behaviour of your wallpaper is convenient and flexible: simply install wallpaper-tray or drapes from the Synaptic Package Manager and add the applet to one of your desktop panels.


You can change the preferences to automatically change your desktop at regular intervals and dictate how the wallpaper renders simply by right-clicking the applet and selecting the Preferences option.


Enjoy!

Friday 29 October 2010

Seeing is Believing

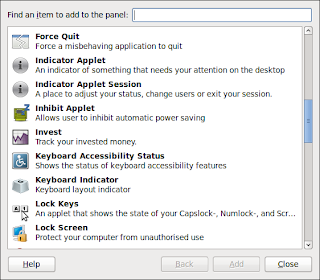
My wireless keyboard (a Logitech Dinovo) has no onboard indicator lights for the Caps & Number lock functions. This is no problem in Ubuntu, you can add a keyboard indicator applet to a panel.

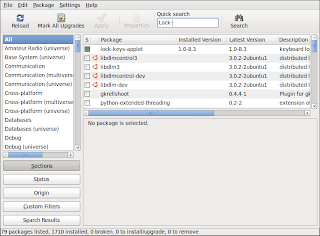
If the applet doesn't appear in the Add to Panel menu, you can add it via the Synaptic Package Manager: search for Lock-Keys-Applet and check the installation box.


Simply right click on the panel where you want the applet to install and select the applet from the drop-down menu.


You can hide any of the three indicators (Caps, Num, or Scroll) by right-clicking the icon and selecting Preferences...

Tuesday 28 September 2010

Terminal Access

I moved home recently and discovered that moving house isn't particularly conducive to leisure activity; particularly blogging about computing! However, it can serve to test one's understanding of how computers work or, more accurately, how they can stop working when you move them around.

When I moved, I took the opportunity to change my Internet Service Provider. I won't bore you with all the ways that ISPs in the UK can find to screw up their own processes, suffice to say that it took several weeks before I reconnected to my virtual world. When I finally did connect, I did so using my new ISP's router rather than my trusty (and aged!) 3COM device: I plugged everything in and, presto, out of the box, everything worked as it should and I had the fastest connection to the Internet I have ever enjoyed outside of a professional environment.

You'd think that I'd be happy, right? You'd think that would be enough after weeks of enforced isolation? You'd be wrong!

If you read my post on syncing wirelessly with Windows Mobile, you'll know that I have a couple of legacy devices that can't use the Wi-Fi WPA security protocol and, determined to get back to an integrated network where all my devices could talk to each other, I delved into the workings of my router and changed the security protocol to WEP. However, I must have inadvertently changed a setting that allocates IP addresses to the computers on the network and, once I'd saved the settings, could no longer get an IP address from the router! No IP address, no access!

In desperation I telephoned my ISP. The Technical Department could ping my router and could see it connected to their server, but couldn't manage to help me reset the device. Turning it off and using the reset button had no effect and, after several hours, decided to send me a new router. However, towards the end of the conversation, the helpful young man from India (with flawless English and the patience of Job) mentioned that Telnet might be the answer but, unfortunately, didn't know how it might be achieved. Actually, it turns out that, not only was Telnet the answer but also that it was a simple and (relatively) painless process.

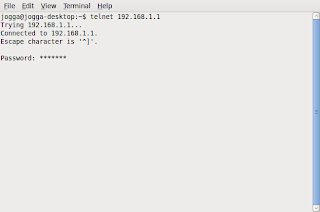
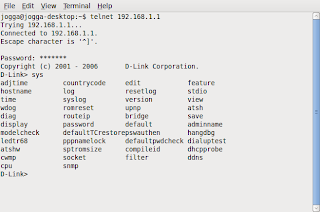
Open a terminal and type

telnet 192.168.1.1

Or whatever your router's default IP address happens to be.

The terminal will prompt you for a password: this is the router's password, not your system password.


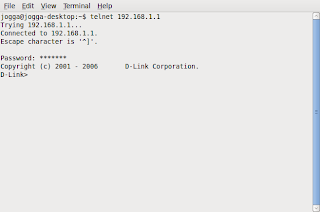
Hit Enter and you have access, although it may not be obvious!


Type sys at the prompt and you'll get a list of all the router's controls.


Just type default (or similar) and follow the instructions or prompts. This should reset your router to the factory settings. However, be warned, factory settings do not include your ISP's login details and you'll need your username and password from your ISP in order to reconnect your router.

Monday 7 June 2010

Before you blame the Equipment Revisited!

It seems that my analysis of my printer problems may have been flawed!

A few days ago I had six documents and three labels to print: all needed to be produced in a rush. Now, call me a cynic, but I can always guarantee that when I'm in a hurry, the bugs and problems will manifest themselves. So, urgent job and I can't get the printer to print more than one document at a time (if I can get it to print anything at all). Thinking that I've already solved the problem I try the cable (no joy), so I replace the cable (still no joy), in despair I turn to Google.

It seems that there is a known bug in the Karmic kernel when using the hplib utility for USB printers (it works fine with network printers). The solution turns out to be fairly simple:
  • Delete the USB printer from the HP Device Manager
  • From the System Menu, select Administration & PrintingSelect Printer from the New drop down menu and the utility will search for available printers.
  • When the printer dialog box appears, select your printer and then click on the Connection option (rhs)

  • Select, USB
  • Click the Forward button and follow the wizard
That's it!

The downside is that I can't use the hp Device Manager to monitor my ink levels or receive status messages: but at least I can print using my hp photosmart 7660 USB printer!

Tuesday 1 June 2010

Window Dressing

Here's a tip that I discovered quite by accident:

I have a Logitech DiNovo cordless keyboard attached to my Ubuntu box and, as with most of today's commercially available keyboards, it comes with a Windows Start Key. If you press and hold the key and simultaneously press the tab key, you can scroll between open Windows in much the same way that you can in Microsoft Vista.


Just press the tab key (whilst holding the Start key) to move to the next window.

Sunday 23 May 2010

The Spring Clean and the Wine

Every now and again I'm tempted to have a tidy up: I know that I shouldn't, but I just can't seem to help it.

To help you keep your system at peak running efficiency, Karmic has a Computer Janitor utility (System → Administration → Computer Janitor) which searches your computer and finds all those orphan programs and shared libraries that it thinks that you no longer need. If, like me, you are a trusting soul, the temptation is to simply click the Do Selected Tasks option and think no more about it: however, I urge caution!

This is the second time that I've used the utility only to find subsequently that I couldn't use Wine. I only use Wine to run a single program, Memory-Map and to be honest, it doesn't run particularly well: nonetheless, I have a great wide-screen monitor on my Ubuntu box and it makes for superb viewing of 1:25,000 scale maps. Anyway, long story short: it seemed easier to remove Wine completely and start from scratch than it did to try and repair the damage. I went to the command line and typed:

sudo apt-get remove wine

Typed in my password and waited for the system to do its thing. After removing Wine, I noticed that there was still an entry for the program in the Applications menu although nothing would work when I clicked on the shortcut. It turns out that the standard remove command doesn't remove the Windows applications, you have to remove the ~/wine directory manually.

Open a terminal and type:

rm -rf $HOME/.wine

Once the directory is gone, you can then remove the menu entries and desktop items:

rm -f $HOME/.config/menus/applications-merged/wine*
rm -rf $HOME/.local/share/applications/wine
rm -f $HOME/.local/share/desktop-directories/wine*
rm -f $HOME/.local/share/icons/????_*.xpm


Source: Wine HQ FAQ 5.1

Reinstalling Wine from the Ubuntu software Centre is easy enough and replacing the map viewer from Memory-Map didn't trouble me either but I will think more carefully about spring cleaning in the future!

Friday 21 May 2010

More Codec Issues

It's funny what you forget when you rebuild your PC. This week I decided to start watching the second series of 24 on DVD. I slipped the first disk into the drive and Movie Player just refused to play!

When I rebuilt the PC, I forgot to install the libdvdcss2 package that allows Ubuntu to play restricted content. Easy enough to fix, open a terminal and type:

sudo apt-get install libdvdread4

You may also need the dvdspu gstreamer plugin:

sudo apt-get install totem-gstreamer


With the plugins loaded, Movie Player played the first episode but wouldn't give me access to the menu nor allow me to jog to the next chapter. I switched to xine and was good to go.

Thursday 20 May 2010

Karmic Cash

It occurred to me that my output to date might suggest that I am anti-Windows, but nothing could be further from the truth. In fact, I'm quite a fan of Microsoft (or, at least I was) and believe that without Bill Gates computing would remain the purview of corporations and academia.

That said, Microsoft (and the other commercial software vendors) also has its flaws not least the constant and unnecessary product upgrades. My foray into open source has taught me that I can be just as productive as I was in my Windows days but save a small fortune into the bargain. Take a fairly average (non-corporate) project manager's software collection:


WindowsUbuntu
Windows 7 (Home Prem/Full)£149.99Ubuntu 9.10 LTS £0.00
Outlook£99.99Thunderbird£0.00
Microsoft Office (Std '07)£349.99OpenOffice £0.00
Microsoft Project (Std '07)£519.99OpenProj £0.00
Microsoft Visio (Std '07)£229.99OpenOffice Drawing£0.00
Internet Explorer£0.00Thunderbird £0.00
Windows Media Player£0.00RhythmBox £0.00
Microsoft Autoroute£49.99OpenStreetMap £0.00
Anti-virus softwarec.£50.00ClamTK Virus Scanner£0.00


That's a lot of cash!

There are a few caveats:

I know that the OS normally comes bundled with a new PC, but if you want to upgrade it will still cost you money and you're tied to the latest technology. Ubuntu on the other hand runs quite contentedly on a pretty old PC: there are exceptions, as my recent experience with Lucid Lynx demonstrates, but you can run an excellent (and safe) system on a recycled base (saving money & the planet).

I've used Microsoft's Retail List Price and no-one pays full price! However, you will pay quite a lot for most of the more arcane Office products (Project & Visio, especially) and they are not always substantially better than the free alternatives.

Some of the commercial software is just better than the free stuff. Again, I would rate MS Project and Visio as far better products than anything that I've found for free: but the question remains as to whether they are so much better as to justify several hundreds of pounds for each version/upgrade.

There are two other considerations when choosing an operating system: virus infections and footprint. Ubuntu is not as prone to attack as Windows and nor does it need the 16GB of disk space to run!

Wednesday 19 May 2010

Do You Scrobble?

One of the fringe benefits of teaching myself Linux by attending the University of Google is that I get to learn all sorts of strange stuff that I didn't know that I didn't know (if you'll excuse the Rumsfeldism). For instance, whilst trying to fix my Zen recently, my research exposed me to the hitherto unknown expression, scobbling.

I know, it sounds like something that you'd catch if you hadn't taken precautions! However, as a verb, it appears to mean collecting data (particularly data regarding someone's taste in music) in order to refine service delivery and/or for social networking purposes. The (rather convoluted) wiki definition goes thus:
To publish one's music-listening habits via software, as counted events when songs or albums are played, to selected internet services in order to track them over time, out of curiosity and/or to make them visible to others.
It seems that it all stems from Last.fm, an Internet radio site that records the details of its listeners' musical tastes to better provide content to its audience.

So, there you have it: when we give up this information willingly it's called freedom (or, scrobbling ;)), if it's taken by stealth, it's called invasion of privacy.

Just trying to learn you all something!

Monday 17 May 2010

Karma and Zen

Lets' face it, Ubuntu doesn't get everything right and it can even be as bad as Windows at times! OK, I've had one of those weeks: first the printer saga and then Windows nuked my Creative Zen V!

The Zen comes with some Windows sync software which (frankly) is rubbish, but I'm a creature of habit (aka, stupid) and still insist on trying to transfer music to my Zen using Vista. Somehow, connecting my Zen to my Vista machine (something I've done countless times before) triggered some sort of kill command and Windows happily obliged.

Alright, I'm overstating it, but you take the point: when I attached my Zen it was one of my favourite gadgets, when I detached it, it was a brick. It only happened because the postman delivered the new Jackson Browne album yesterday and I wanted to get it straight onto my PMP for those long walks in the Welsh hills.

Fortunately, Google had the solution and, to my palpable relief and benefit to my temper, I was able to revive my Zen. That's the good news!

The bad news is that for some completely insane reason, I decided that Ubuntu must be able to sync my PMP with my music on my network and I spent the next twenty-four hours trying to get it to work. Entertainment is one area of personal computing that I think Windows wins hands-down: leaving aside the (excellent) Windows Media Player, there are all sorts of alternative entertainment packages that beat the Linux offerings into the dust. I'm sorry, but that's just how I see it. That said, I really don't want to be tied to Microsoft just so that I might occasionally update my music, so Ubuntu was going to have to play ball (even if it killed me).

The real irony is, when I plugged my Zen into the USB of my Ubuntu box, Linux saw it immediately and mounted it in Nautilus. Now that's impressive! However, the problem comes with the proprietary formats used by Creative: Ubuntu just can't read them without a little help and you need to install the MTP support packages from Synaptic. Even then, you can't just drag and drop as you would in Windows Media Player because the Zen doesn't add the new files to the library (see the wiki link above for an explanation). I wasn't too phased by this: I still had Rhythmbox to try and, sure enough when I opened Rhythmbox, there was my Zen listed in the side panel waiting patiently for me to do something. Unfortunately, everything I tried to do was fruitless. Dragging tracks to the Zen resulted in the music being added to root and not the Music folder: consequently, the PMP couldn't play them. I tried the command line but with the same result (even using the folder ID numbers rather than, names), I wasted hours trying to get it to work - all to no avail.

So, onto gnomad2. This just didn't see the device at all and I had absolutely no joy in finding a solution. My best guess is that, had I owned a Zen V Plus (rather than the Zen V), I might have made it passed the finishing post, but as it was nothing helped. I even compiled and installed the latest version in the vain hope that it would solve the dreaded "No jukeboxes found on USB bus" error message. The lsusb command listed my Zen, so I know that the USB bus was working ok: but nothing I tried (even a firmware update) would coax gnomad2 to talk to my PMP.

In desperation I finally turned to Amarok. The version from the repository was rubbish: it wouldn't even play music in my Music folder on the PC! It didn't see the Zen (until I realized that I had to unmount (I much prefer "demount", but let's go with the lingo) it first) far less read it. Anyway, as a last resort, I compiled the latest version from source and....

It worked!

I can now send music to my Zen and it loads all the artwork and track listings as it should. It is noteworthy that Amarok still won't play music on my PC, but hey, you can't have everything!

By the way, if you have a bricked Zen, try connecting it to a PC via a USB cable, slide and hold the on switch while you use a pin to reset the device. Worked like a charm for me.

Saturday 15 May 2010

Before you blame the Equipment...

I've had one of those days: my network printer ran out of ink this afternoon (yes, I know!) and I remembered that I had an old hp Photosmart 7660 in a box upstairs.

I was confident that I could just plug the USB cable into the back of my Ubuntu box and get on with life because that's what always happens when I plug anything into Linux! However, after connecting it to the pc and wiping the dust away, I began to suffer an intermittent but persistent fault: after printing a document or test page, the printer would just hang and I would get a strange error message from my hplip toolbox if I tried to send anything else to the spooler. I could restart the printer by unplugging it from the mains and then print a new document, but after that, I couldn't get it to do a thing. I confess that my first reaction was to think that it was a hardware problem and that my trusty printer was destined for the local dump (I mean, recycling centre, of course!).

I've had the printer for years and only replaced it when it refused to play nice with Windows Vista (more accurately, Windows Vista refused to play nice with any of my hardware): it's always produced excellent quality print both for office use and photographs, so I was sorry to see it go. More to the point, it didn't consume huge amounts of resource on my old PC nor require the obscene bloatware that accompanied its replacement. The Photosmart 7660 also has an embedded card reader, so getting it to work would have been a seamless replacement for my inkless All-in-One machine and I really didn't want to run around on a Saturday afternoon buying overpriced cartridges from the local office supplies store. I tried everything that I could think of to get it to work: clearing the print queue, rebooting the PC, restarting hplip, having another coffee...

The only thing that didn't occur to me was to exercise the first lesson of PC maintenance: check the cables!

Yep, the USB connection on the printer was not pushed fully home: a small adjustment later and Ubuntu has once again demonstrated its superiority to anything Microsoft has to offer: much faster, up to date information and beautiful prints!

The only thing wrong with my Ubuntu box is the idiot on the other end of the human interface devices! The lesson (had I bothered to learn it way back when Windows 3.1 was my weapon of choice) is to check the cables and connections whenever you have problems with hardware: perhaps I've learned it this time.

Friday 14 May 2010

More on the Lynx

I've just downloaded Ubuntu 10.04 LTS and run the Live CD on my Inspiron 530s (running Windows Vista) and it works a charm!

I suspect that much time will be spent playing!

Thursday 13 May 2010

The Toy Shop Window

William E. Shotts, Jr.'s take on the difference between Windows and Linux:

"When I am asked to explain the difference between Windows and Linux, I often use a toy analogy.

Windows is like a Game Boy. You go to the store and buy one all shiny new in the box. You take it home, turn it on and play with it. Pretty graphics, cute sounds. After a while though, you get tired of the game that came with it so you go back to the store and buy another one. This cycle repeats over and over.

Finally, you go back to the store and say to the person behind the counter, “I want a game that does this!” only to be told that no such game exists because there is no “market demand” for it. Then you say, “But I only need to change this one thing!” The person behind the counter says you can't change it. The games are all sealed up in their cartridges. You discover that your toy is limited to the games that others have decided that you need and no more.

Linux, on the other hand, is like the world's largest Erector Set. You open it up and it's just a huge collection of parts. A lot of steel struts, screws, nuts, gears, pulleys, motors, and a few suggestions on what to build. So you start to play with it. You build one of the suggestions and then another. After a while you discover that you have your own ideas of what to make. You don't ever have to go back to the store, as you already have everything you need. The Erector Set takes on the shape of your imagination. It does what you want.

Your choice of toys is, of course, a personal thing, so which toy would you find more satisfying?"

pp.70-71 The Linux Command Line
I've referenced (and recommended!) this work before and do so once more.

I've been working my way through this guide and, as my confidence and competence grow, I understand how worthwhile that investment of time and effort has been!

Wednesday 12 May 2010

Panel Problems

I've had a erratic but persistent problem with the Notification applet on my panel: when I restart my machine (not (usually) when I boot my machine), the network icon fails to render (also known as paint) leaving a black hole that neither responds to attention from my mouse or my keyboard.

There are several suggestions on the Internet about what might cause this and how it might be resolved, but none of them have been successful in my case. That said, it's an irritation rather than a major inconvenience and it's easily fixed by opening a terminal and typing:

killall gnome-panel

The killall command stops the panel and, as soon as this happens, the kernel re-starts it rendering all the icons as they should appear. However, I must be getting lazy in my old age and even this simple operation is too much bother! So, I created a simple shell script and allocated it to an application launcher on the panel.

Open a text editor and type: killall gnome-panel. If you want to add some notes about the purpose of the shell (which is a very good idea), simply use the hash (#) symbol at the start of a text line and the command line interface will ignore it when it runs. Save the file as Notification_Panel_Fix.sh (or any name of your choice) in your home directory.

Open a terminal and type:

chmod +x ./Notification_Panel_Fix.sh

This makes our file an executable shell script.

Right click on your panel where you want to add your launcher and click Add to Panel.... From the Add to Panel... dialog box, select Custom Application Launcher.
  • Type is Application
  • Name can be anything that you want, but I think simple is best, so I advise that you make it as descriptive as possible.
  • Command is the full file path to the Notification_Panel_Fix.sh file - it's case sensitive, so use the browse button if your typing is rubbish!
  • The Comment can be anything but will appear when your mouse hovers over the application icon so, once again, make it descriptive and meaningful.


You can add (or change) an icon to the launcher simply by clicking on the icon in the top left hand corner of the launcher panel. You'll find more icons in the /usr/share/icons directory.

Now all you have to do is click the icon if you need to restart the gnome-panel: simple!

Tuesday 11 May 2010

Karmic Candy

One of the benefits of rebuilding your PC is that you get the opportunity to address all those little niggles that you never quite got round to fixing first time round.

Take the boot splash screen in Ubuntu 9.10: could the Ubuntu developers have made it any more dreary? In previous incarnations of Ubuntu, changing the splash screen was simple using the gdmsetup client (graphical display manager) from the System → Administration menu but in Karmic, this function has disappeared but it's still possible to change the splash screen if you know where to look.

The artwork for the splash is located in the /usr/share/images/xsplash directory (go and have a browse) and you can change the background image for one of your own choosing. If you have more than one image (each called bg_####x####.jpg, where ####x#### is the screen resolution), you can either replace them all (to be safe) or determine which one boots by establishing your display resolution and simply replacing the file that most closely matches that parameter. Assuming that you only have one (as I did), choose your replacement file and, using the GIMP Image editor, scale your new image to the relevant size.

Firstly, make a backup of the existing background just in case there's a problem. In this instance, I'll save a copy to the Pictures directory. Open a terminal and create a new directory for storing the backups of the original files. You can call it anything you like, I've called mine xsplash_backup:

mkdir ./Pictures/xsplash_backup

Now, change directory to copy the original files:

cd /usr/share/images/xsplash

Copy the files to your backup directory:

cp *.jpg /home/[user name]/Pictures/xsplash_backup

Now copy your replacement background to the xsplash directory making sure that you use the correct name to replace the existing file.

cd /home/[user name]/[file location]
cp -u bg_####x####.jpg /usr/share/images/xsplash


Obviously, change the user name, file location and file name as appropriate! If you get an error message telling you that you don't have access rights to the target directory (the xsplash folder), log on as root and repeat the instruction. To log in as root:

sudo -i

You can use Nautilus to check that your new background has made it safely to its new home if you feel the need. Now all you need to do is to reboot and watch in satisfaction as your new creation makes the start up sequence more pleasurable.


Here's my new splash screen by and artist called thewer, it's a download from the Ubuntu-Tribal Pack available from gnome-look.org. Just compare it with that old un-Karmic background.


I know which one I like more!

Monday 10 May 2010

Making Space

If, like me, you've got directories, files or drives with embedded spaces (whitespace) in their name (for instance, External Hdd) you may experience problems trying to reach them using the command line, try putting the name in quotes, thus:

cd /media/"External Hdd"

or (to display a text file with whitespaces in the terminal)

less /home/usr/"Word Space File.txt"

Or, if that doesn't work, a backspace might do the trick:

cd /media/External\Hdd

The double quote method works for me, both with directories and files: however, the lesson learned is that, if you intend to use the command line, try to avoid embedded spaces in Directory and file names. For instance, a better name for the drive in this case might be: External_Hdd (note the underscore!)

Sunday 9 May 2010

Fixing Firefox

If you want to load the latest version of Firefox onto your Ubuntu system, you can't use the official repositories as these only hold the latest version of Firefox available at the time of your version's release (source: SourceForge). Happily, there is a way to install the latest version and get security updates and bug fixes as part of your normal update routine: I won't replicate the step-by-step instructions here, you can follow them on the Ubuntuzilla project page.

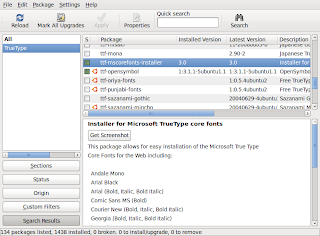
However, once you download Firefox, you may not be particularly impressed with how Ubuntu renders web pages. You can fix this by adding Microsoft's TrueType fonts to the ~/.fonts directory in Ubuntu. Open a terminal and type (or copy & paste) the following:

sudo apt-get install msttcorefonts

Input your password at the prompt and the system will download and install your fonts. If you'd rather not use the terminal, you can use the Synaptic Package Manager to achieve the same result: from System → Administration → Synaptic Package Manager and search for the libfreetype6, ttf-freefont, ttf-liberation, ttf-opensymbol and ttf-mscorefonts-installer packages.


Next, you need to force your font information cache files to refresh in order to make the fonts available. You can either log out and log back in or run the following command in the terminal:

sudo fc-cache -f

Now you can change fonts in Firefox: From the Edit menu select Preferences and then the Content icon. You can change the selected font from there and see the changes in real-time. The good news is that installing these fonts has implications system-wide including other applications such as OpenOffice.

If you spend a lot of time in front of your screen, this is a life-saver.

Saturday 8 May 2010

The Koala and the Lynx

It's always best to do your research before you start any project and this is especially true in IT.

When I started my journey with Ubuntu (Hardy Heron), it was no more than an experiment on a spare PC that I had lying around: over the next couple of years, Ubuntu became my primary operating system for an outlay of less than £100 for a new hard-drive (if you ignore the cost of the PC as a sunk cost) and that's not bad for a for a system that can do everything the competition can, requires a fraction of the disk space of Windows and is significantly more secure into the bargain!

Moreover, one of the great things about Ubuntu is that it will always be free and that includes security updates and OS upgrades. Compare that to Windows: if I wanted to upgrade Windows Vista to Windows 7 (probably not a good idea anyway), I could expect to pay between £70 and £100 for the privilege (based on today's Amazon prices for Home Premium upgrade) and hope that all my existing software would work.

Sadly however, I rarely take my own advice! At the weekend I decided to take a peek at Ubuntu's new release, Lucid Lynx (10.04 LTS) and, in a fit of uncontrollable enthusiasm decided to upgrade!

The short version is that the escapade was a disaster: my graphics card is not supported and I couldn't get the visual effects to work (even in normal mode) so I ended up rebuilding Karmic from the floor up. The good news is that I've rather enjoyed the rebuild and it was great to see how far I've come in open-source computing in a relatively short space of time. More to the point, I would never have been brave enough to even countenance upgrading a Windows machine: so even a failure turned out to be a success!

Karma in 3-D

If, like me, you enjoy the occasional game of chess, Ubuntu comes with a chess (glchess) program as standard and available via the Applications → Games menu. The application isn't built on a particularly good chess engine, but for those five minute coffee breaks, it can provide an enjoyable diversion.

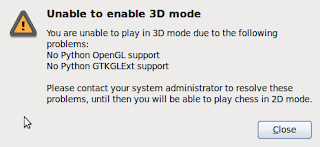
However, I was puzzled that I couldn't get the game to render in 3-D and the error messages that plagued my screen whenever I tried.


To be honest, it wasn't the most pressing of problems so I ignored it, making the ease at which this irritation is resolved doubly embarrassing!

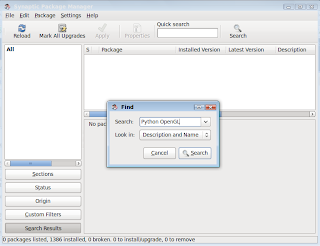
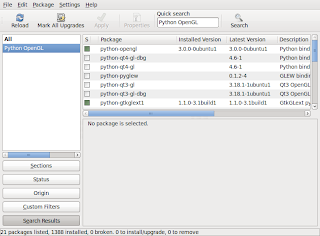
If you want to play glchess in 3-D, open your Synaptic Package Manager (found in System → Administration) and, after entering your Administrative password, search for Python OpenGL using the search function. Scroll down the returned search results until you find the two packages required (python-opengl & python-gtkglext1). Simply mark the check-boxes (select mark for installation from the drop-down menu) and click the Apply button.


Follow the prompts and the accept the package review screen and close Synaptic when it's downloaded and installed the packages: that's it!

If glchess is open, close it and then re-open and select 3-D Chess View from the View menu.

Friday 7 May 2010

Synchronizing WinMob PIM Data with Ubuntu - Post 4

Originally posted at Mobility Site in the X50 / X51 Forums/Tips and Tricks forum as multiple posts under the pseudonym, Jogga. It's the last in my series of setting up FinchSync to synchronize WinMob devices with Ubuntu.

Syncing Multiple PCs

If you want to sync multiple machines and aren't bothered about keeping your data separate (for instance, work and private information), you can simply create an Alias client server on the PDA.
  • Set up the server information on your PC (following the instructions in Post #2)
  • Create the Sync Sources on your PC
  • Create your Client and allocate the Sync Sources (just follow the instructions in Post #2)
  • Set up the server information on your second machine (again, following the instructions in Post #2)
  • Add the same Sync Sources on your second PC with exactly the same name(s)
  • Create a Client and allocate the Sync Sources
  • On your PDA, set up the first server as per the instructions in Post #3
  • Add a second server, giving it a separate name but add the name of the first server as an Alias in the Alias dialogue box


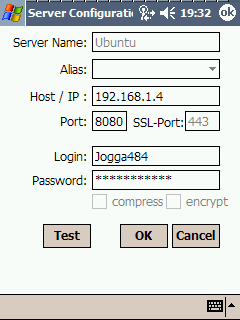
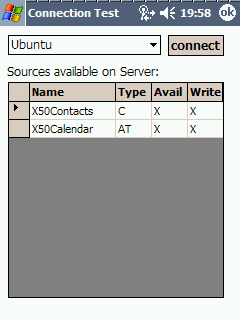
As you can see, the first screen shows the Ubuntu server settings and the second shows my laptop with the Ubuntu server name (ironically enough, Ubuntu) in the Alias drop-down menu. When you Test the server connection settings, you'll see the server name (in this case, Laptop) with the Alias in brackets.


Now, data will happily travel between PCs and your PDA: you can (apparently) set up as many machines as you wish. I am currently sharing (and syncing) data between a desktop (Ubuntu – Karmic), a laptop (Windows XP) and my Axim X50 – all wirelessly!

Uninstall FinchSync from Your PC

I can't imagine why anyone would want to uninstall this remarkable program from their PC, but if you do, simply delete the FinchSync directory (the folder and all its contents that you created in Post #2): that's it!

Uninstall FinchSync from Your PDA

Removing the application from your PDA is a little more complicated. First, you delete your servers from the Server list (this is a manual process).
  • Open FinchSync on your PDA
  • Tap Config
  • Tap Server
  • Select each entry in turn and tap Remove
  • Tap Yes on the dialog box each time it appears
According to the FinchSync documentation, this removes all synchronized items from your Pocket PC! Now you can simply remove the programme using the Remove Programs option in the usual manner.

Additional information:
”Two small configuration files may be left by the uninstaller. To remove these files, use the 'File Explorer' to navigate to the folder 'My Device/Program Files' and delete the folder 'FinchSync'.”
From the FinchSync Documentation

Avoid Corrupting Your Data

Before synchronizing your PDA close Thunderbird on your desktop and all Outlook programs on your PDA. I can't stress this enough: if you synchronize with Thunderbird open, you will corrupt or delete your data – Don't say that you haven't been warned.

Good practise dictates that you backup your data regularly and your contacts and calendar data is no exception. The good news is that it is relatively easy to write a simple shell script that can automate the process of closing Thunderbird and opening the FinchSync GUI.Open a text editor (not a word processor) such as gedit or (my favourite) Scite and type the following into a new document:

#!/bin/bash
#Run FinchSync from a single command line
killall /opt/thunderbird/thunderbird-bin
# Closes Thunderbird before opening Finchsync as recommended by Markus Rahiff
cd /home/[usrname]/finchsync
# Changes directory
java -jar finchsync.jar
# Executes Java GUI


Save your file in your /home/[usrname] directory as, finchsync.sh. Obviously, the spelling and file extension are important: so get it right!

Now you need to make the file executable. Open a terminal and, if you have stored your file your home directory, type:

chmod +x finchsync.sh

If you want to test the code, simply type:

./finchsync.sh

And the FinchSync GUI should appear. From now on, you can open the GUI from a terminal simply by typing the command above, saving one whole line of command and several characters from the second line. However, you will still need to open a terminal and type the command in order to access the GUI: wouldn't it be so much better to have a clickable icon on your desktop panel? Fortunately, Ubuntu makes this easy to set up.

Right-click on the panel where you would like your icon and select Add to Panel from the drop-down menu. The Add to Panel dialog box should open:


Select the Custom Application Launcher and click Add. The Application Properties dialog box will appear.


  • The application type is: Application
  • The application name is FinchSync
  • The command is the directory path and file name. For instance, my path looks like /home/jogga/finchsync.sh – the applet recognizes this as an application because you've made the file executable with the chmod command.
  • The comment can be anything that you want. When you hover your mouse over the icon, the system displays the application name and your comment, so make the comment relevant to the operation of the icon

Click the icon and watch the GUI open as if by magic! Ironically, it takes longer to type (and read) these instructions than to actually execute them. I hope that you'll find this a useful mod to your system.

Working with Microsoft Windows

The process for creating and opening the FinchSync GUI is (very) slightly different on Windows. I've only installed it on XP, but having created the directory and copied the Java file to the folder, there is no need to run code at a command prompt: just double click the Java file (called “finchsync Executable Jar File 738KB”) and the GUI will open.

Pretty much everything else is the same as per the Ubuntu instructions although in Windows, the IP address in the status bar of the GUI seems to be the correct one.

Killing the Server using a Web Browser

Simply type http://[ip]:[port]/status into the web browser address bar, type in the user name and password created in Post #2 and click Stop Server.

I find that just exiting the application is sufficient, but there you go!

Thursday 6 May 2010

Synchronizing WinMob PIM Data with Ubuntu - Post 3

Client Side – Installing & Configuring FinchSync on Axim X50

Originally posted at Mobility Site in the X50 / X51 Forums/Tips and Tricks forum under the pseudonym, Jogga. If you can't wait for the final post, head on over to Mobility Site.

No mystery here, the appropriate download is found on the same page as the PC Server application: make sure that you download the one necessary for your device. For the X50, you need the Pocket PC Client application (Windows Mobile <= 5.0, .NET 1.1) .cab file (or the .zip file).

Download the file to your computer and use Activesync (perhaps for the last time!) to copy it to your pda. Double tapping the file installs FinchSync on your device.

You'll find the program in the Program listing and you open it as you would any other application. Now that it's installed, you have to configure the client to talk to the server.


  • Tap Config.
  • Tap Server.
  • Tap Add.
  • Complete the log-in details (established when you set up the client on the Server), making sure that you use the correct IP address and leaving the Alias field blank.


Click the Test button to test the connection to your Server by tapping Connect on the next screen. If all's well, you should see the Sources table appear: if you get an error message, check your settings and/or your firewall.


You're almost ready to sync your data! However, first you should set up your category maps on the client. Category maps help keep data synchronized between discrete machines and discrete categories: for instance, if you sync your PDA between a home and work PC, you may not want your “home” data appearing on your “work” server and visa versa. I used the default settings because I don't really use categories a great deal. If you want to know a little more about how they work, have a look at the Sync Guide Documentation.

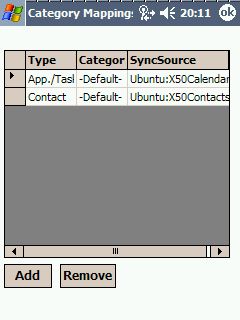
To set up your Category Maps, tap Config and then Category Mapping.


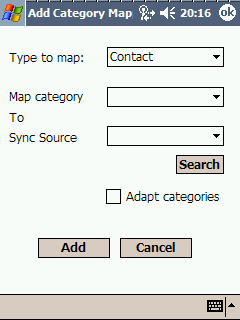
Here's my categories, your initial table will be blank. To add a category, tap Add.


In the above example, I am mapping Contact details on my PDA with my address book on the Sync Sources (X50Contacts): for the Map Category drop down box, I selected the -default- option, but you can map all of your categories back to Thunderbird. Check the Adapt categories option to rename the category field of all existing items according to your mapping.

Make sure that you map all of your Sync Sources to categories and you're ready to synchronise your devices.
  • Close Thunderbird on Ubuntu (how I wish someone had told me that!)
  • Turn on WiFi on your Axim
  • Start The FinchSync Server on Ubuntu using a terminal and the java command outlined earlier
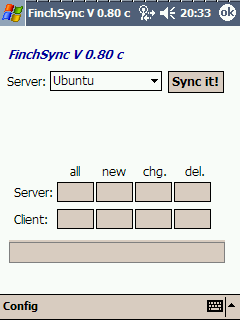
  • Start the FinchSync client software on the PDA from the Programs screen
  • Select your Server from the drop-down box
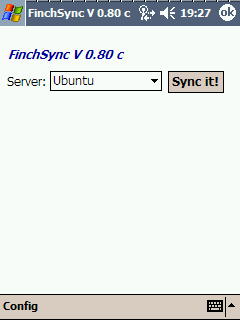
  • Tap Sync it!


That should be that! I'll post some hints and tips tomorrow but you must make sure that you close Thunderbird before syncing or you may corrupt or loose data!

Good luck and, if you do try this, let me know how it goes. The good news is that FinchSync works on Windows also, so Outlook could be a thing of the past for syncing mobile data!

Wednesday 5 May 2010

Synchronizing WinMob PIM Data with Ubuntu - Post 2

Server Side – Installing & Configuring FinchSync on Ubuntu

Originally posted at Mobility Site in the X50 / X51 Forums/Tips and Tricks forum under the pseudonym, Jogga. It is the second of four posts: if you can't wait for the next two in the series, head on over to Mobility Site.

Installing FinchSync on Ubuntu is easy:
  • Create a file on your hard drive called finchsync (my path looks like this: /home/jogga/finchsync).
  • Download the PC Server application from the FinchSync Downloads Page (you'll have to accept the Terms and Conditions – the file is called FinchSync.jar (738 KB)) and save (or copy) the download to the finchsync folder you created in step 1. You don't need to open the file or do anything clever: simply copy the download to the finchsync directory!
Now we get to configure the FinchSync server (the PC application that you've just downloaded). Open a terminal and change directory to the finchsync folder.

cd /home/[usr]/finchsync

When the terminal has changed directory, we'll open the FinchSync Gui using:

java -jar finchsync.jar

All being well, you should see the FinchSync GUI.


When the GUI appears, you may receive the error message, 'Address already in use: JVM_Bind': this can be safely ignored for the time being. Next, from the toolbar, select File and Server Configuration and you should see the Server Configuration dialog box.


The http port should be set to a value between 8080 & 8087 (although theoretically it can have any value between 0 and 65535): if the value selected has already been allocated, you'll be prompted to change the setting. Be warned, if you change the setting you must close and restart the server before the changes take effect. Keep cycling through the numbers until you find a vacant port number. If you are using a firewall, you'll have to open this port in order to allow the pda to connect: I use Firestarter and opening the 8080 port is straightforward, so I can help with instructions if needed (anything else and you're on your own!).

If you select the Enable Status Page option, you can kill the server via a web browser using http://[ip]:[port]status. Please note that the IP address is not the one shown on the GUI status bar (at the bottom of the GUI): it is most likely the eth0 IP address followed by the port number you selected. For example, I would type http://192.168.1.4:8080/status into my Firefox browser and the status page appears: to find the appropriate IP address for your set up, open a terminal and type:

ifconfig

When you've completed the user and password fields, click OK (and remember what you've typed!).

Now we can tell FinchSync what we want to synchronize: these are called Sync Sources. Click the Sync Sources tab in the FinchSync GUI.


Obviously, your table will be empty! Click the Add button to start the setup wizard.
  • Enter a unique name and click Next (as an example, for my contacts source, I used the name X50Contacts which (I hope) is pretty self-explanatory).
  • From the Source drop-down menu, select either the Address Book or Calendar option.
  • Browse to where your file is stored on your hard drive. You can use the Scan Disk option, but this can take time in Ubuntu and I didn't find it helpful (and it never found the relevant files!). If you are setting up you contacts, you are looking for a file called abook.mab which is in the /home/[usr]/.thunderbird directory in the Default user file. Your calendar is in the directory that you created when you started so it should be easy to find!
  • Click Next.
  • The next screen gives some additional configuration options. Read Only prevents the client (i.e. your mobile device) from changing source data (not useful if you make changes to your calendar or contacts on the move!).Config opens another dialog box allowing you to block application preventing Thunderbird from opening if a sync is in progress (very useful as you will later see!).
  • Click Finish to set up your Sync Source and repeat for additional Calendars or Address Books.
Now we can set up the client. Click the Clients tab.


Now click the Add button to set up your client.


Enter a name for your device and a password. These are your log-in details when we set up the client side software, so make a note of the details! You can add a description of the device and then select which sources you want to sync by clicking the Add button. A dialog box gives you the options set up in your Sync Sources, just select the ones that you want to sync.

Phew, that's the PC set up: now for the pda!

Tuesday 4 May 2010

Synchronizing WinMob PIM Data with Ubuntu - Post 1

Originally posted at Mobility Site in the X50 / X51 Forums/Tips and Tricks forum under the pseudonym, Jogga.

One of the shortcomings of Linux distributions is the difficulty of synchronizing PIM data with Microsoft Windows in general and Windows Mobile in particular, or so I thought! Actually, this perception is more a reflection of Windows than Linux, but as open-source mobile devices are still comparatively rare, syncing Windows devices with Linux distros is still the mobile equivalent of cross-platform nirvana. Notwithstanding the incompatibility issues, I still wanted to find a way of synchronizing all of my PCs and mobile devices and I recently came across a freeware application called, FinchSync by Markus Rahlff that promised to do just that.

Whilst the FinchSync setup is not particularly intuitive for the technically challenged (like me) and the documentation seems a little vague, after some hours of frustration, blind alleys and trawling the FinchSync forum, I have finally managed to synchronize my Axim X50 contacts, calendar and task data with Mozilla Thunderbird over my WLAN.

It's worth mentioning that I haven't managed to get a USB connection to work using Ubuntu (but I think that's mainly because I'm inept) and have only managed to sync over the wireless network. But hey, that's not bad, right?

Anyway, I thought that I'd share the process with you and hopefully help anyone interested in trying this to avoid mistakes. However, this is going to be a marathon post, so I'm going to break it into four sections:
  1. This brief introduction
  2. Server Side installation and configuration
  3. Client Side Installation and Configuration
  4. Troubleshooting Hints and Tips
My setup:
  • Axim X50 2003 Second Ed v 4.21.1008
  • Ubuntu 9.10 (Karmic)
  • Mozilla Thunderbird 3.0.4 with Lightning Calendar 1.0b 1extension
  • DELL Inspiron 6400 (XP Pro) running the same Thunderbird setup as above
Setup Process

Housekeeping

I recommend that you review (and cleanse) your contact data before attempting this setup and then backing up your address book. That way, if things go wrong (and they might!) you'll be able to restore your data quickly and easily. Use the Export function from the Address Book toolbar (Tools → Export...) and save your address book as a LDIF file on your hard drive (you'll thank me one day).

For some reason, the latest builds of Thunderbird use .sqlite file formats for calendar data and FinchSync can't read this format because there is no native java support! In order to synchronize your calendar, you'll need a .ics calendar file somewhere on your hard drive or network. I set up a folder in /home/[usr]/ (change [usr] to your user name) called mycalendars (so my file path is /home/jogga/mycalendars) and just built a new calendar in Thunderbird for the purpose (of syncing data), but, if you are an old hand with Thunderbird, you'll probably want to import your existing calendar into a new calendar file with the .ics file extension. To create a new calendar:
  • On the main toolbar, click File → New → Calendar...
  • Select the, On the network option and click Next
  • Select the iCalendar (ICS) option and, in the location dialog box, type: file:///[calendar location]/[Calendar Name].ics (my location path looks like this: file:///home/jogga/mycalendars/Private.ics) and click Next
  • Choose the calendar name, colour and email address and click Next
  • All being well, you should get a confirmation screen telling you that your calendar has been created (it should also appear on the sidebar): click Finish

That's the housekeeping taken care of: it gets a little tricky from here on, but nothing we can't handle!

If you can't wait for the next three posts, feel free to head on over to Mobility Site. While you're there, feel free to sign up and add input where you can.